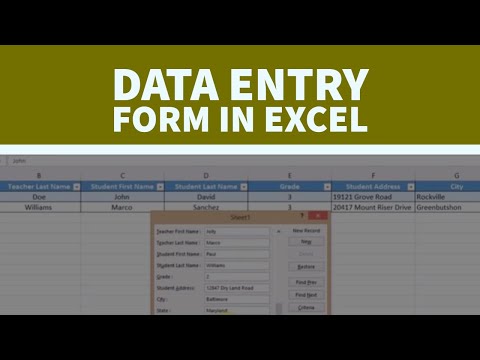
Hello, this is Gigi from GG's Channel. Today, I'm going to show you the benefits of using a data form to enter data in Excel. This will be very helpful for anyone who needs to enter data into a large Excel spreadsheet when the ROI of the data is very wide and requires repeated horizontal scrolling. To use a data form to add, edit, find, and delete rows, there are two steps involved in this process. First, select any cell and then insert a table. Make sure you have everything selected, where the data of your table starts with cell 1 and goes all the way to J-3. Also, make sure to select "My table has headers". Once you have completed the first step, we can move on to the important step. Go to the "File" menu and click on "Options". From there, go to "Customize Ribbon". Here, you will see popular commands in Excel. We are going to add a new command that is not in the ribbon. Click on "New Tab" and rename it as "Data Entry". Then, click "OK". Next, we are going to create a new group under the "Data Entry" tab. This group will be called "Data Entry Form" for easier organization. After clicking "OK", we need to find the command we are looking for, which is the "Form". Add the form to the "Data Entry Form" group and click "OK". Now, you will see the data entry form in the "Data Entry" tab. To add more data, click on one of the cells and click on the form. Scroll down to see the second row, which contains the information for Steve Williams. To add a new row, click on "New" and input the teacher's name (first name: Jolly, last name: Marco), the student's name...
Award-winning PDF software


Video instructions and help with filling out and completing How Form 2220 User